Showing posts with label completed projects. Show all posts

Tuesday, August 30, 2011

Sewing swimwear - it's not as hard as you think!

I am waaaay behind in getting my projects onto this blog!  In late June, we flew to the East Coast for a weeklong vacation in Nantucket, meeting quite a few members of Tim's family there.  It was my first time there and I absolutely loved it!  Not only because it was our first taste of Summer 2011, but the island is just so picturesque and lovely.


If you love beach cottage style, Nantucket is your heaven.  We rented bikes one afternoon and took L out for her first ride.  She actually fell asleep during the ride!  She did great during the whole trip, but naps?  Fugetaboutit.  So pretty much anytime we got in the car (or on a bike!), she was out.

I wanted some new swimwear for the trip.  And I didn't want to spend hours in tiny dressing rooms with fluorescent lights trying on pieces that only half appealed to me.  So I decided to try my hand at sewing swimwear.  I figured the results couldn't be much worse than RTW.

The very first thing I did was arm myself with some knowledge about sewing swimwear.  Two resources that helped pump me up:

1. Lori's Sew Forth Now podcast, Episode 5: Dive into Swimsuits. In this episode, she interviews Anne St Clair on the ins and outs of sewing swimwear. I highly recommend a listen if you are planning to sew swimwear! She talks about needles, stitch types, elastic, fabric stretch - all the details of swimwear.

2. Threads Magazine #131, the June/July 2007 issue has an article "Inside Secrets of a Swimsuit" that provides info similar to the podcast, and of course the pictures are helpful.

Patterns
  

I made the McCall's 5400 tankini and the McCall's 3566 boyshorts.

Fabrics
Milliskin Matte with 4-way stretch in Navy for the fashion fabric (it's a very nice, weighty material), and nylon lining (HSL-02) for the lining, both from Spandex House.

Notes on construction/alterations


McCalls 5400 tank, tied and untied

The tankini is fully lined and the pattern instructions are very clear, this turned out to be an easier project than I anticipated and could certainly be made in one evening if one is determined to do so.  The front is made of two pieces with a horizontal seam just under the bust.  You leave a slit in that seam at center front, then you put a tie through to cinch the center front together, creating a nice shape at the bust.  There are separate pattern pieces for the upper front for A/B, C and D cup sizes.


I went to my local fabric shop to find bra cups, but they only had sew-in cups, which I didn't want.  The wonderful saleswoman there tipped me off that if you go to the swimwear section of a large department store, they will often have random, orphan bra cups that they're willing to give to you - free!  So I dutifully headed downtown to Seattle's favorite department store, and sure enough I was allowed to dig through a box of homeless swim bra cups.  I found quite a few matching pairs and took 2 sets.

Now, if you sew this pattern as instructed, it won't accomodate removable bra cups, but it's easy to create a pocket for these.  I cut a second lining piece for the upper front, but cut about an inch off at each side seam.  Layer this with the regular lining piece for the upper front, and be sure to leave the narrower lining piece's sides free when you are sewing the side seams.  You'll end up with a pocket where you will be able to slip the bra cups in.


The McCalls 3566 boyshorts were even easier to sew.  Other reviews I've read of these boyshorts said that they run large, so I made a size 10 (I used a 12 in the tankini - and did quickie muslins of both to check the sizing).  I took some height off the waistline and I took some length off the legs so they were more like a pair of RTW swim shorts that I like.

The pattern instructions advise you to line just the crotch, but instead I created a full lining.


Conclusion
Together, these pieces are somewhat reminiscent of a retro style suit.  These simple styles were perfect for me to "dip my toes into" the world of sewing swimwear (pun intended).  I have another pattern for a one-piece suit that I am hoping to tackle before a trip to Maui next month.

If you have been considering sewing swimwear, give it a try!  At worst, you'll lose a half yard of fabric and a few hours of your time.   More likely, you will probably end up with a half decent swimsuit!

Thursday, August 4, 2011

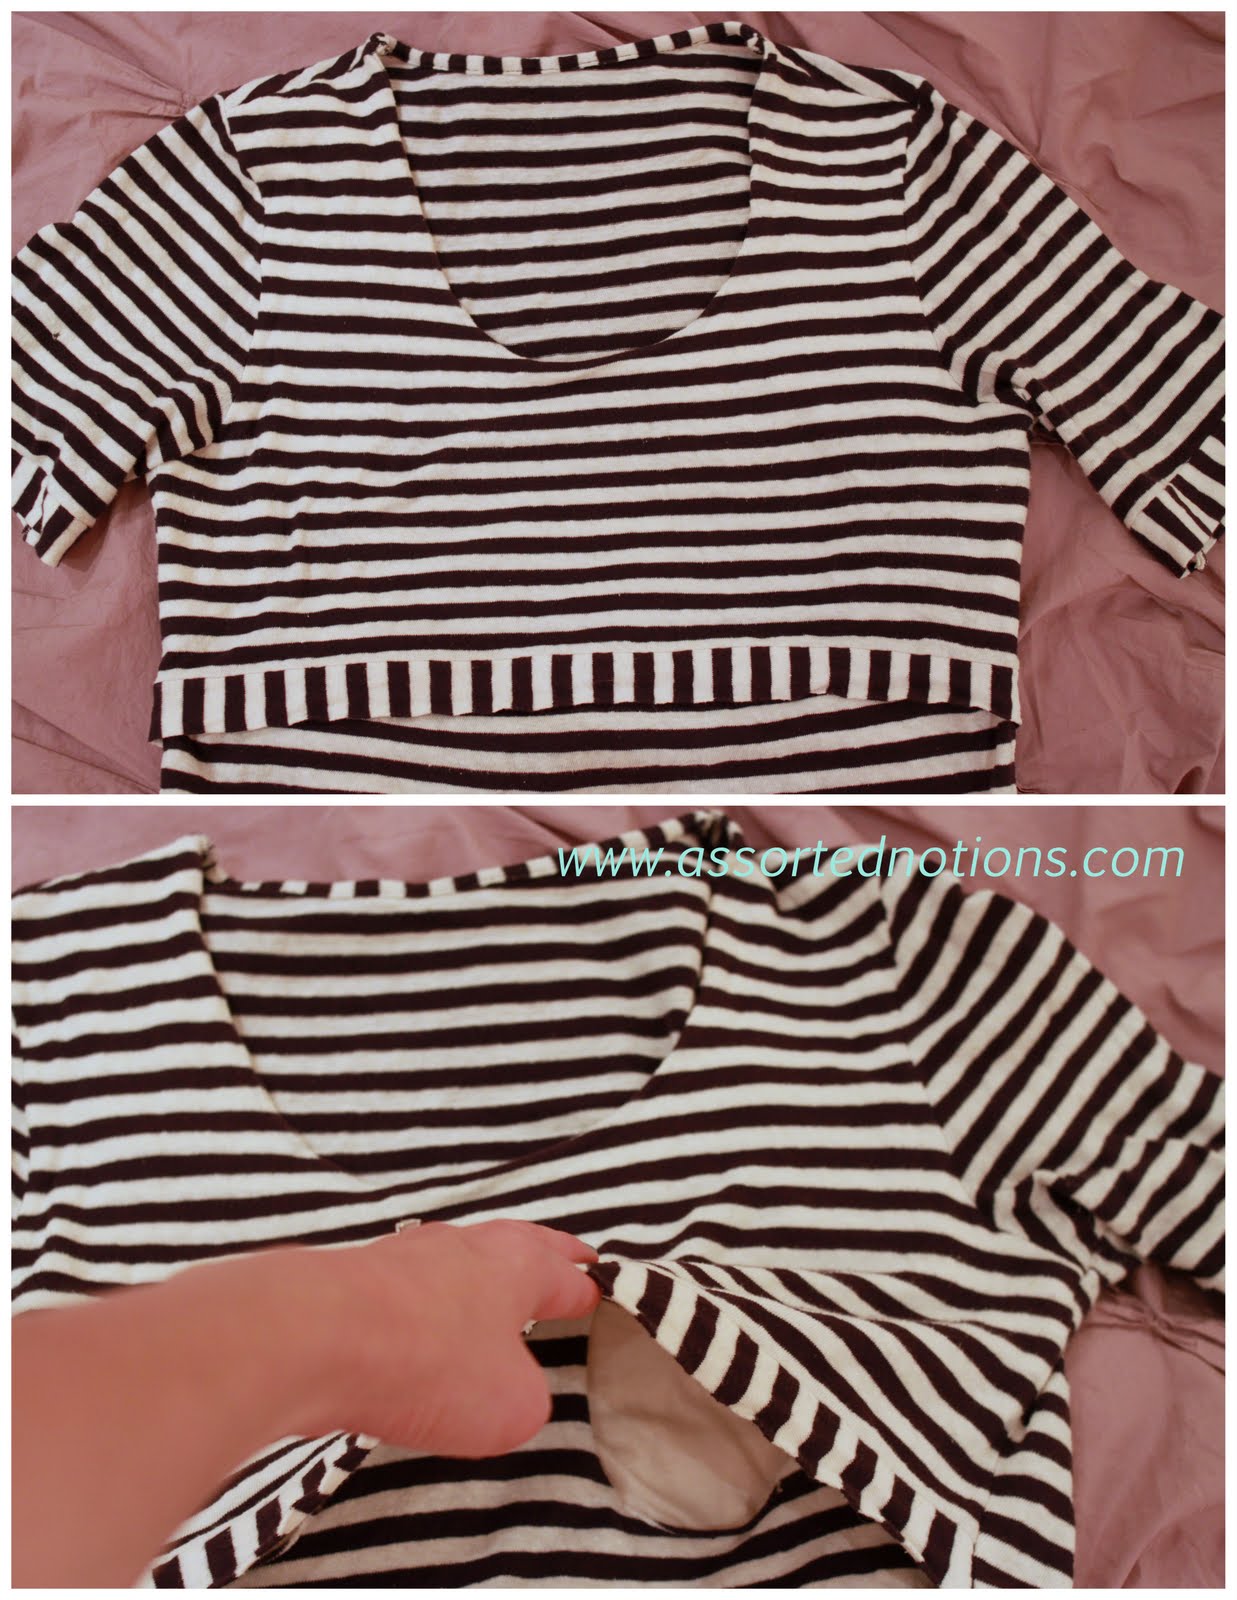
Tutorial: Nursing alteration for t-shirt sewing pattern


Can you stand another post in which I mention breastfeeding? Since this week is World Breastfeeding Week, I thought it would be a perfect time to show you my absolute favorite (and one of the very few) nursing tops that I made, and how you can make your own!


About a year ago, my local BurdaStyle Sewing Club had a sew-along in which we all used the BurdaStyle Lydia t-shirt pattern to sew a top for ourselves. It was great to see everyone's interpretations. I used the pattern as a starting point for a top based on a RTW nursing top that I saw online (and can no longer find to show you, unfortunately...).


Fabric
Navy/cream striped fine sweater-knit cotton jersey purchased during Summer 2010 at Pacific Fabrics.  The bolt was actually labelled "100% recycled cotton jersey" - recycled from what, I don't know...


Notes on construction/tutorial
I didn't take any photos during construction so hopefully words will suffice.  I know, a tutorial with no photos is no fun.  Sorry.

There are a few different ways you could make this style, but here's how I did it:

1.  Cut out the front, back, and sleeves as normal.  I altered mine by cutting a deeper front neckline and by cutting the side seams a bit wider with more of an A-line shape, and I also added length.  During those first few post-partum months, I avoided anything fitted in the waist!

2.  Cut a second front bodice piece, but not the full length - this will be the shorter, top layer of the bodice.  You'll want it to fall at least a few inches below your bra band.  For now it's better to cut it too long than too short, you can check the length in a bit.  I'll refer to this as the "short front" and the other front bodice as the "long front".

3.  Stitch the 2 fronts together at the neckline, with the wrong side of the "long front" facing the right side of the "short front".  Turn so that the "short front" is laying on top of the "long front".  You should be looking at the right side of the fabric on both pieces.  Baste together at the shoulders.

4. Finish the neckline of the back bodice with your preferred method.  I used a strip of the fashion fabric to bind the back neck, you could also just press the raw edge to the inside and topstitch.

5.  Stitch the front and back bodices together at the shoulder seams.  Stabilize those shoulder seams with some interfacing, if you're so inclined.

6.  Now is a good time to check the length of the "short front".  Baste the side seams together (we're still sleeveless at this point) and put the top on.  You'll want the "short front" to provide a bit of coverage below your bust, but the final length is up to you.  Cut off length to shorten if necessary.

7.  Hem the "short front" with your preferred method.  I decided to play with the direction of the stripes of my fabric and hemmed it with a narrow band.  Baste the "short front" and "long front" together at the side seams.

8.  Stitch the sleeves to the bodice.  I always set my sleeves in flat when I'm working with knits.

9.  Stitch the sleeve seams and side seams.

10.  Hem the sleeves and bodice, again however you prefer.  I used vertical stripe bands to hem my sleeves in order to complement the bodice.

11.  Now put the top on and mark both bust points on the "long front".  Take off the top and cut a small circle around each bust point.  Smaller is better at first, you can always cut a larger circle if necessary but you can't go the other way!  Initially I tried cutting just a slit instead of a circle, but that didn't provide great access for me, so I ended up with circles.

Voila!  You are the proud owner of a stylish nursing top.


Conclusion
I get a lot of compliments on this top.  From people who don't know it's a nursing top.  (I think it's the stripes, actually.)    It's so simple yet one of my favorite pieces I've ever made.

Leave a comment or shoot me an email if you have any questions about the construction!

Tuesday, August 2, 2011

June Burda Magazine tunic blouse

At long last, I finally got around to having Tim to snap some pictures of the June Burda top that I made.


This is the kind of garment that I just luuurve.  My office is pretty casual, I work at a computer most of the day, so I wear it just like this both to work and on my days off.


Fabric
I used a cotton chambray that I bought from the Britex remnant table during their 2009 Black Friday sale when I was with my sewing BFFs Cindy and Leslie.  It's heavenly, like something you'd expect too see in a nice men's shirt.

Notes on construction/alterations
It's your standard woven shirt construction, nothing that'll surprise you.


The front bodice has both a pleat and gathers where it meets the front yoke.  The design is very similar to  the Anthropologie Puckered Pocket Blouse, which has a pleat at the front yoke and also has pleated sleeves (and, interestingly, no pocket mentioned in the online description).


You are supposed to cut 2 back pieces, stitch them together at the CB line and topstitch along that seam. This is a straight seam and I accidentally cut it on the fold.  I thought the back might look too plain, so I cut a 1" strip of my fashion fabric, tucked the raw edges under and topstitched it along what would have been the CB seam.  It's kinda straight.  Kinda.

Baby's in bed and mama's off to Trader Joe's


I guess I should also mention that the top 2 buttons are on the v-neck and not intended to be buttoned, I just included one of those.


Conclusion
Like I said, I love this shirt.  Before I made this, I was all set to make the dress version too (style 105).  Now I'm not so sure that'd I'd love it as a dress.  We'll see.

---------

I have several other new pieces to share with you. Swimwear(!) for me, and clothes for the kiddo. Stay tuned.

Friday, June 24, 2011

Vogue's 2011 bestseller


Photos from Style.com


You can now count me among the many who have made Vogue 1224, the Tracy Reese knit pullover dress that has won many hearts.  It seems all seamstresses are pulling out their wild jersey prints for this one, and so did I.


Fabric
I used a lightweight rayon/lycra jersey, originally purchased Summer 2010 at Pacific Fabrics, a local fabric store chain.


Notes on construction/alterations
One feature of this dress is an elastic waist that hits probably at the natural waist or higher on most people. I noticed that many other reviewers of this pattern lengthened the bodice and lengthened the skirt, but I decided to keep both as drafted.  I'm just a bit short-waisted so this worked for me.

When the weather's not exactly warm enough for a dress, I wear it as a tunic with pants.


The pattern calls for the skirt to be lined.  I used the same fashion fabric for the skirt lining and I deviated from the pattern instructions in that I assembled them as you would a bubble skirt - I'd much rather stitch one seam than two hems.  Because the lining is shorter, you can't tell at all when I'm wearing it.


Conclusion
I'm still breastfeeding so I continue to scrutinize garments as to whether they provide easy nursing access.  It turns out that Vogue 1224 is a stylish option for all the nursing mamas out there!

The neckline drawstring is actually a length of elastic with a fashion fabric tie stitched to each end.  The elastic is entirely hidden within the drawstring casing but it means the neckline has tremendous stretch (and recovery!).  So, this pattern is a winner in my book.


---


I finished BurdaStyle Magazine's 6-2011-104 button-up shirt but still need to get some pictures.  Coming soon...

Tuesday, June 7, 2011

Burda/Blumarine wrap dress


The last thing I need in my wardrobe right now is an animal print wrap dress, but I just couldn’t help myself! I’ve already traced 2 patterns from the June 2011 issue of Burda magazine, which was exciting after nearly a year of issues that didn’t thrill me.


Photos from style.com

I am a sucker for a sewing pattern that has a designer’s name attached to it, and the Blumarine wrap dress in the latest issue of Burda was no exception. The dress is from the Spring/Summer 2011 collection, which is full of soft color and animal prints.

I was even more excited once I realized that I already had the nearly perfect fabric for this dress (I am on a mission to sew up my stash - which is taking up precious real estate in a huge dresser in my daughter’s room (AKA my former sewing room – sigh…)). In 2009, I bought an animal print jersey during my vacay in Italy . Bingo – animal print Italian fabric to go with the Italian label dress!


Fabric
Rayon/lycra jersey (I think) from Bassetti Tessuti in Rome, Italy.


Notes on construction/alterations
I made my pre-pregnancy size 38, but I could have probably benefitted from a 40 in the waist and the hips.  Even though I'm back to my pre-baby weight on the scale, my measurements aren't there yet, a fact about which I'm still in denial.  The line drawing and runway dresses appear much more loose and drapey in fit than my dress does.

The Burda magazine instructions do not call for any interfacing at all in this dress, but I decided to apply interfacing to one side of the collar and one side of the front band.  The jersey I used is super soft, so I used Sew Exciting's Pro-Sheer Elegance, it's a barely-there fusible interfacing and was perfect for this project.  I also fused bias tape to the shoulder seams to prevent them from stretching out.


If you decide to interface the collar, it's important to use something that leaves the collar very soft and malleable.  The collar and the front band are both stitched to the bodice along the same stitching line, and the collar needs to be able to fold back over the front band.

The bell sleeves are fun, the perfect long length (on me, at least) as drafted, but they do have a tendency to slide and bunch up around your elbows if you lift your hand up (i.e. while sipping a cocktail, as one very well might be doing when wearing a dress like this).  In fact, while I wore this dress, I was thinking about the thumbholes that Trena added to her ballerina wrap sweater...


Conclusion
We had a babysitter booked for Saturday night, and I finished this just in time to be my date-night dress.  The v-neck of my dress isn't as low as me as it appears in the runway garments (all a matter of how much you cinch the dress I think), but I still needed a U plunge bra in order to not have to worry about exposed undergarments.  If I were to make this again, I would add some length to the skirt, since I personally think this would look best on me if it hit right at the knee.  And, I would love to raid Tany 's jewelry box for the perfect bling to accessorize this!

Monday, June 6, 2011

More comfy sleep set PJs


I am having too much fun making PJs for L.  Here's another set of the Stitch Magazine Comfy Sleep Set PJs that I first showed you in my previous post .  The dark pink fabric is from an old t-shirt I was about to donate and the other fabrics and ribbing are from the stash.  L is just starting to stand on her own and walk, so here she is showing off her new skill.

Photo from www.green-cotton.dk

I was inspired by these pajamas that I found on www.green-cotton.dk (the direct link to this product no longer exists).  I like the mix of fabrics and the knee patches.


Miss Sarah asked if I hemmed the two front bodice pieces together or separately - I hemmed the them together as one.

Now that the evenings are getting warmer, I may adapt the pattern to make short sleeves instead of long and shorts instead of pants.

Sunday, May 22, 2011

Stitch Magazine comfy sleep set

During a recent gathering with my local BurdaStyle sewing group, I learned of a website called Sew Daily from the Interweave group that publishes Stitch magazine.  The site has quite a few free pattern downloads available, the caveat being that the download only contains the pattern pieces and the instructions are found in a corresponding issue of Stitch magazine. I found a pattern for some fun kids pajamas that appeared in the Spring 2011 issue, the Comfy Sleep Set. I don't have the issue but decided to give them a try anyway.

Photo from Stitch/Interweave

Description by Stitch Magazine: "Inspired by the traditional kimono, this sleep set is perfect for active toddlers. The ribbed-knit cuffs on the sleeves and legs fold up and down for extra growing room, and the comfortable elastic-free waistband gets its stretch from a little spandex in the knit." Designed by Bonnie Ferguson

The pdf download includes the pattern pieces for the shirt and the pants, and it provides the dimensions for the various bands of ribbing.  In this post from the pattern designer's blog, you can see that there is ribbing around the waist as well.  The only thing I wasn't sure about was the size of the seam allowance (which I assumed was included in the pattern), so I just went with 1/2" and that worked well for me.


I used a mix of fabrics from the stash - the striped fabric came from a thrifted t-shirt, the solid in the bodice is leftover from when I made these leggings, and the rib knit is from Joann, purchased in anticipation of one day needing it for toddler-wear.


L is currently nearly 20 pounds and 30 inches tall - I made the 12 month size and there is plenty of room for growing, which is a plus.


Stitch Magazine offers the pattern in sizes newborn - 12 months, and Bonnie Ferguson added sizes 18 months - 5T on her blog - how cool is that? I definitely see more of these in my future, and they are a fun way to use scraps and repurpose old tees.

Friday, May 6, 2011

First birthday dress

We celebrated L's first birthday recently and so of course the occasion called for a new dress. Well, two dresses - one for her professional pictures and another for her birthday party.  I had an idea in mind of a dress with a crossover bodice, but I couldn't find an existing pattern for one in my stash, so I did a little bit of redrafting.

I started with Burda Magazine 11-2007-136, which I chose because the fitted bodice and full skirt were a good starting point, then muslined it to check the fit, omitting the collar and shortening the sleeves and skirt.  After that I altered the pattern again to remove the puff sleeve gathers, raise the waistline, and make a crossover front bodice.  It sounds like a lot of work, but things go very fast when you're working with tiny pattern pieces.

This is the birthday party dress.  The fabric is a girly sweet cotton lawn from Denver Fabrics (also available in another colorway, if you're interested).


The leggings are Ottobre 1-2011-9, I'm going to make another pair of them and I'll talk about them more after that.


I made the same dress in white swiss dot for her professional photos.  The bloomers are Burda Magazine 7-2008-134 (also made them a while ago for my niece).


And I made the fabric flower belt and hair clip in a few different colors since I wasn't sure which color would look best with the photo backdrop.  That was a busy week.  But I love how the photos turned out.


Here are a few more photos from L's birthday party.  The party was totally for me, not for her.


One of L's friends gave her a set of butterfly wings, they were adorable but she kept taking them off.


Oma flew in for the party too.  We made fringe streamers using the tutorial from Oh Happy Day.  They were gorgeous and so easy.


Initially, she wouldn't dig into her cake, I had to give her a slice and she ate it as daintily as a one-year-old could.  It wasn't long before it was all over everything though.


We hung a fabric bunting in the entry way.  I found the fabrics at The Quilting Loft in Seattle and priority mailed them to my mom the week prior to her arrival because I knew I wouldn't have time to make it. I'm so lucky to have a mom that sews, too!  It made such a difference, too - really added to the fun party vibe.

We also hung a collage of pictures of L's first year (on the TV, which was the only good place for it); I totally swiped that idea from a birthday party we were at a few weeks ago.

Coming up - women's apparel! Yes, I actually sewed something for myself. I promise this blog hasn't gone totally baby.  I made a Tracy Reese/Vogue dress, I love it.